How to Lock Cells in Google Sheets
Knowing how to lock cells in Google Sheets can help you protect your data from unwanted edits. Learn how to use this feature with this tutorial.
![[Featured Image] A person is on a laptop learning how to lock cells in Google Sheets.](https://d3njjcbhbojbot.cloudfront.net/api/utilities/v1/imageproxy/https://images.ctfassets.net/wp1lcwdav1p1/1SE3sXAnuY2SoLZ2mwdpDa/709bd84142c16c09908f97dbceb47095/GettyImages-1600877824.webp?w=1500&h=680&q=60&fit=fill&f=faces&fm=jpg&fl=progressive&auto=format%2Ccompress&dpr=1&w=1000)
Key takeaways
To lock cells in Google Sheets, access the Protect sheets and ranges from the Data menu, select the Set permissions button, and apply your changes.
Locking cells adds a layer of security, ensuring that only people with the appropriate permissions can modify them.
As an alternative to using the Data menu, you can right-click on the selected cells and choose Protect range from the context menu.
You can give permissions to Only you, Only domain, or a Custom group of people whose email addresses you provide.
Afterward, consider strengthening your abilities to work with data using Google Sheets by enrolling in the Google Data Analytics Professional Certificate on Coursera. You can learn at your own pace while building your spreadsheet and data analysis skills.
Why lock cells in Google Sheets?
Locking cells in Google Sheets adds a layer of security, ensuring only authorized individuals can make changes to them. Working in Google Sheets, you could have many columns filled with data cells. You may want to lock some of them to protect them from unwanted edits. Knowing how to lock cells in Google Sheets ensures that only people with the appropriate permissions can modify them.
How to lock cells in Google Sheets
Briefly, a quick summary of the steps required includes:
Open your Google Sheets document and select the cells or range of cells you want to lock.
Choose Protect sheets and ranges from the Data menu.
Click on the Set permissions button.
Apply your changes by clicking the Done button in the pop-up window to finish protecting the cells.
Let’s examine these steps in more detail.
1. Open your Google Sheets document and select the cells or range of cells you want to lock.
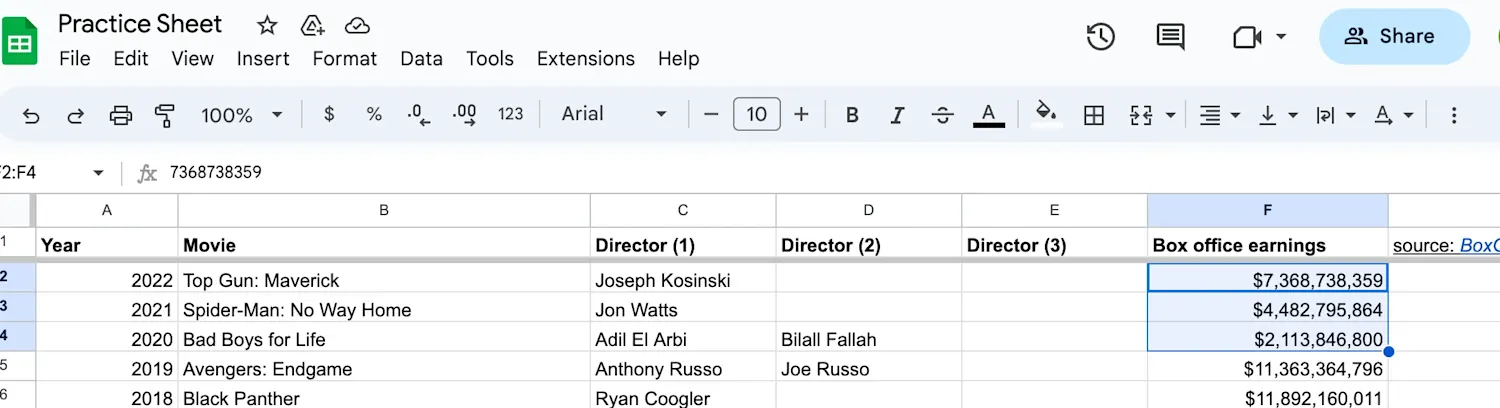
Let’s say you don’t want anyone else to change the data in our practice sheet's first three cells in the Box office earnings column. You would select those three cells.
2. Choose 'Protect sheets and ranges' from the 'Data' menu.
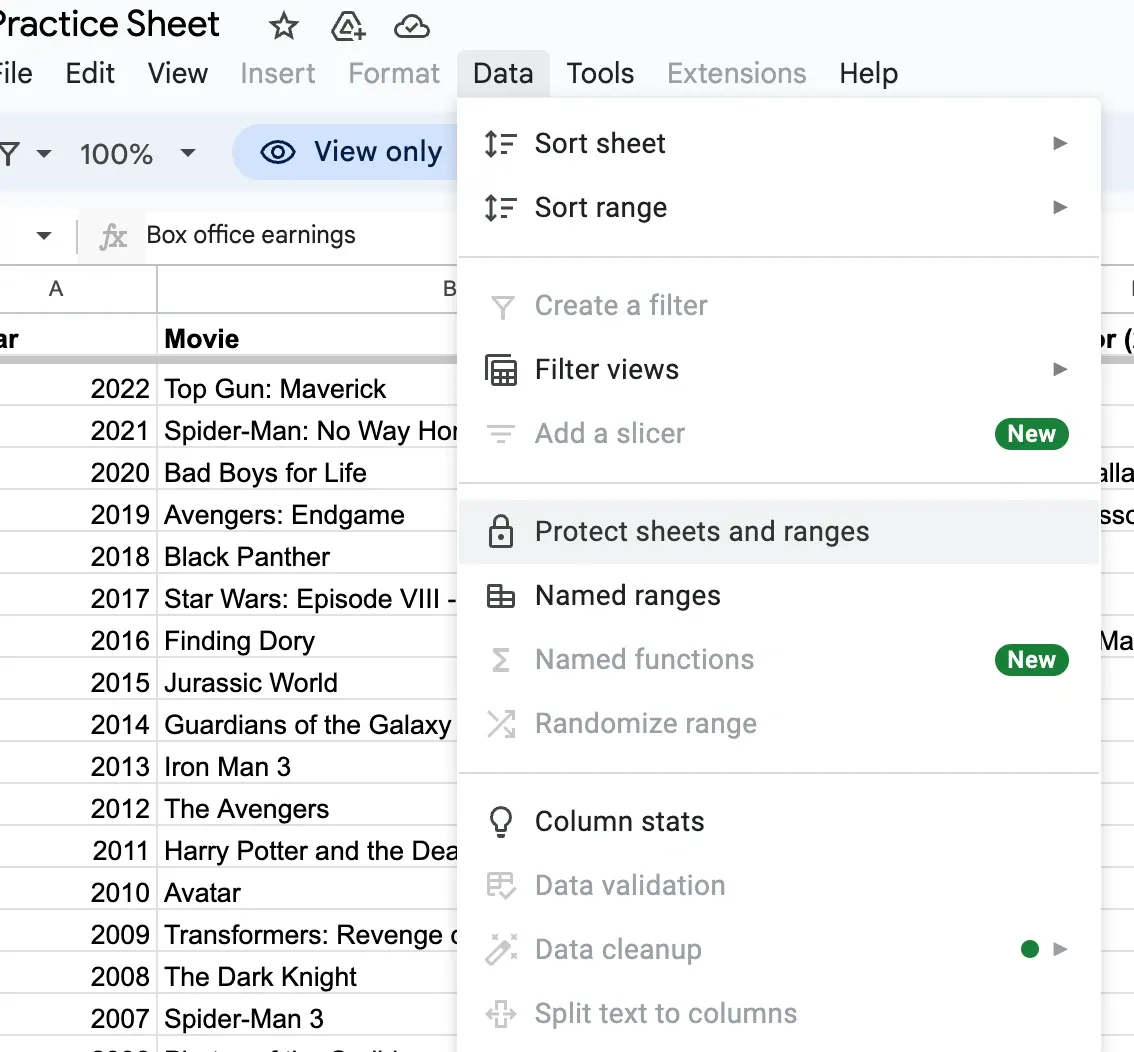
Alternatively, you can right-click on the selected cells and choose Protect range from the context menu. A sidebar with the range or sheet you want to protect will appear on the right side of the screen.
3. Click on the 'Set permissions' button.
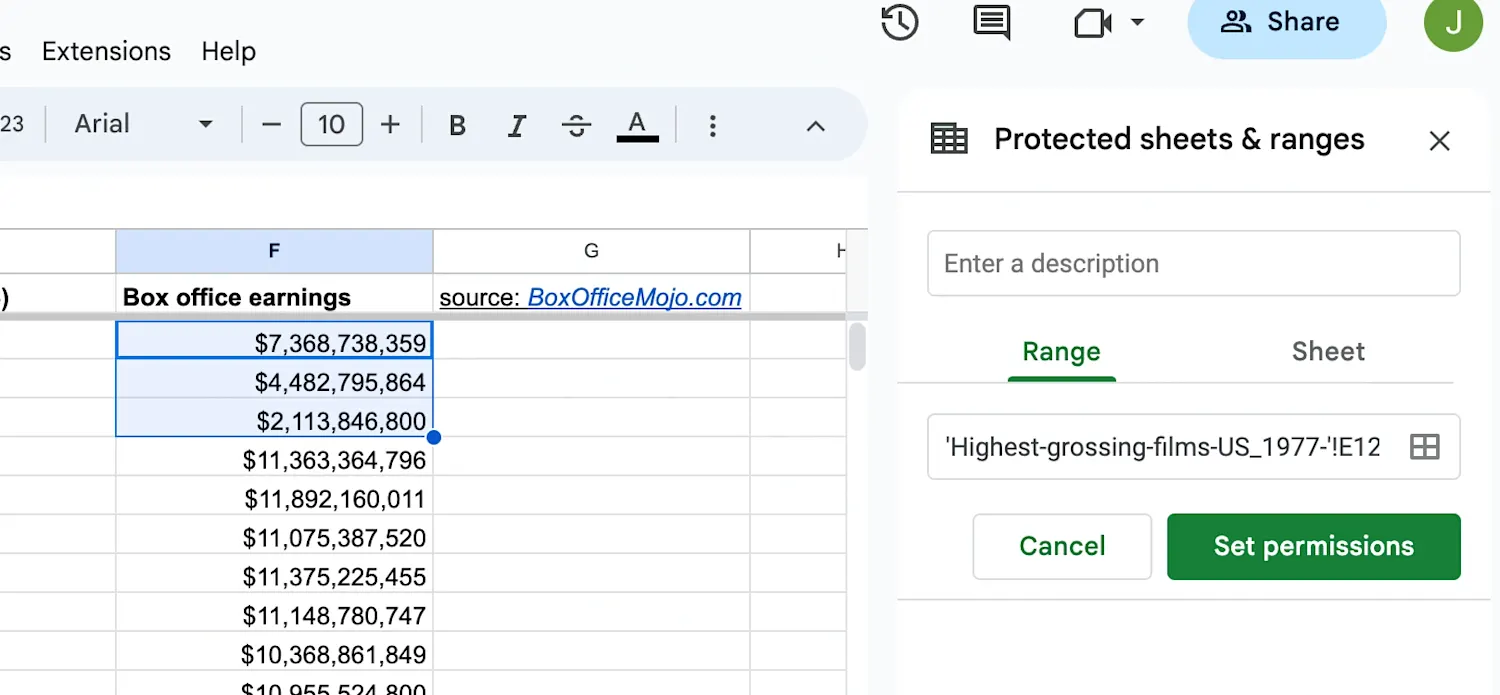
In the Set permissions section, you can specify who can access the locked cells. By default, Only you will have access.
You might change the permissions to Only domain, where only people in your domain can edit the range or sheet.
You could also select Custom, which lets you add the email addresses of the people who can edit the range or sheet.

4. Apply your changes by clicking the 'Done' button in the pop-up window to finish protecting the cells.
You can also define what actions users can perform on the protected cells. By default, Can edit is selected, but you can change it to Can comment or Can view if desired.

To see your protected cells, you can click View > Show > Protected ranges, and you’ll see a striped background on your locked cells.
Using the Protect range feature, you can maintain the integrity of your data, prevent accidental modifications, and control the level of access for collaborators working on your Google Sheets document.
How to lock cells in Google Sheets with password
While Google Sheets does not offer a password option for locking cells, you can still lock cells and sheets to block access by following the steps above. You can also restrict access to Google Sheets by opening the Share button, adding people, and selecting Editor, Commenter, or Viewer access. Additionally, you can adjust the General Access setting through the Share button by selecting Restricted, in which only people whose email addresses you've entered can access the sheet, as opposed to Anyone with the link.

Troubleshooting
While locking cells in Google Sheets, you may encounter some common issues that require troubleshooting. If you can’t access a sheet, ensure you’ve been given the appropriate access level (edit, comment, or view). The file owner may need to change the permissions settings. You can Request access from the “You need permission” page. Otherwise, you might try accessing that file from a different Google account.
Access more Google Sheets and data resources
Keep up with career trends and helpful tutorials by subscribing to our YouTube channel. Then, explore our additional free resources for learning more about Google Sheets and data:
Watch on YouTube: How to Highlight Duplicates in Google Sheets
Follow a tutorial: How to Freeze a Row in Google Sheets
Read our Career Chat issue: The 4 Types of Data You Need to Know
Whether you want to develop a new skill, get comfortable with an in-demand technology, or advance your abilities, keep growing with a Coursera Plus subscription. You’ll get access to over 10,000 flexible courses.

Keep reading
- November 18, 2025
- June 20, 2026
- October 6, 2025
- April 30, 2026
- June 20, 2026
- April 15, 2026
Coursera Staff
Editorial Team
Coursera’s editorial team is comprised of highly experienced professional editors, writers, and fact...
This content has been made available for informational purposes only. Learners are advised to conduct additional research to ensure that courses and other credentials pursued meet their personal, professional, and financial goals.